Trigger Bell

すべての自転車において最も優れた安全な自転車ベル

ブレーキング中でも完全な制御下で自転車ベルを鳴らしてください。

トリガーベルを鳴らす際に自分の安全性を損なわないようにしてください。グリップを緩める必要もブレーキングとベルを鳴らすことの選択をする必要もありません。

最も安全な自転車ベルは、すべての自転車やスクーターのゴムグリップに取り付けることができます。だから、今こそ自分自身と他の道路利用者の安全性を高める時です。

下の写真をご覧ください。ブレーキング中にトリガーベルを鳴らす方法が示されています。

フラットバーハンドル

Ringing The Safest Bike Bell On Flat Bars

ロードバイク

Ringing The Safest Bike Bell, Trigger Bell v6, On Drop Bars

9/10
トリガーベルは非常によく考えられ、素晴らしく実行されているので、私はほとんどの自転車において最初の選択肢としてそれを選ぶと思います。

Happy Cyclists With Safer Bike Bells on Suburban Street
メートルも早く
0

たった10mphで自転車を走行する場合、従来のベルよりも5メートルも早くベルを鳴らすことができ、より安全に保つことができます。 特許取得済みのハンドル下位置は、10人中9人のサイクリストがトリガーベルが従来のベルよりも安全に使用できると言っています。

トリガーベルは命を救ってくれました。ベルを使いつつ強くブレーキをかけることができたので、事故を回避することができました。

1秒間に鳴るベルの回数
0

トリガーベルの位置では、ブレーキング中でも完全な制御下で1秒間に最大5回までベルを鳴らすことができます。 トリガーベルのトリガーは常に親指の届く範囲内にあり、素早く安全にベルを鳴らすことができます。

Happy Cyclists With Safer Bike Bells on Road Bikes

トリガーベル自転車ベルの動作をご覧ください。

トリガーベルの受賞歴

Cycling News
Cycling News
Read More
ベストバイクベルの安全性と便利性に優れています 2023
Ice Bike Org
Ice Bike Org
Read More
ベストバイクベルのエディターズチョイス 2023
Cycling Weekly
Cycling Weekly
Read More
ベストイージーリーチバイクベル 2023
Road CC
Road CC
Read More
ロードバイク用ベストバイクベル 2023
Cycling Brew
Read More
2022年の最優秀総合賞
Pedal Street
Read More
10 響きたい時に最適な自転車ベル
Road CC
Read More
最高の自転車ベル 2022
Bicycling
Read More
道路やトレイルでのサイクリスト向けの10のベスト自転車ベル 2022
Mountain Bike Vibes
Read More
最も安全な自転車ベル 2022
Rydoze
Read More
2021年の10ベスト自転車ベル

自転車ベルのレビュー

Calibre Magazine
Read More
全体的に見て、非常に巧妙なデザインであり、私は強くおすすめします。
Evening Standard
Read More
この小さな驚異的な自転車ベルは、ブレーキング、曲がり角、ギアの変更中にも素早く使用できるように設計されています。
Tripleshot Cycling
Read More
本当に素晴らしいですね... そして、ハンドルから手を離さずに親指で簡単に鳴らすことができます。これはトレイルを走行する際に重要です。
Road.cc
Read More
9/10. Well designed and works on almost any bike – if you want a small but useful bell, look no further than this.
Cyclist
Read More
常に手の届く位置にあり、素敵な音を奏でるトリガーベルは、ドロップバーユーザーには標準モデルよりも適しています。

自転車ベルのフィードバック

The Safest Bike Bell, Trigger Bell v6, Fits All Bikes

どんな自転車でも安全なサイクリング

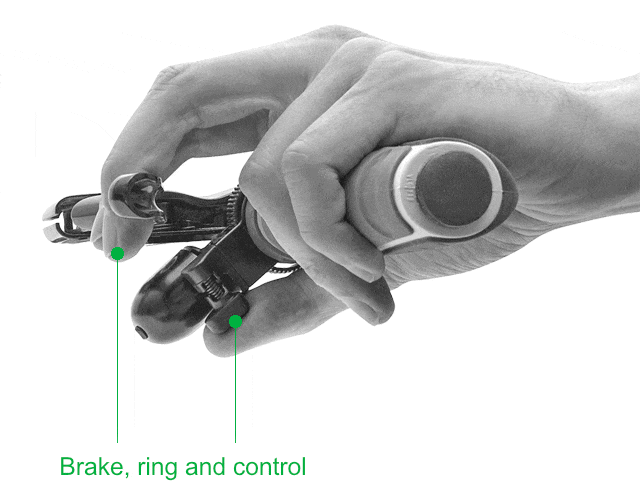
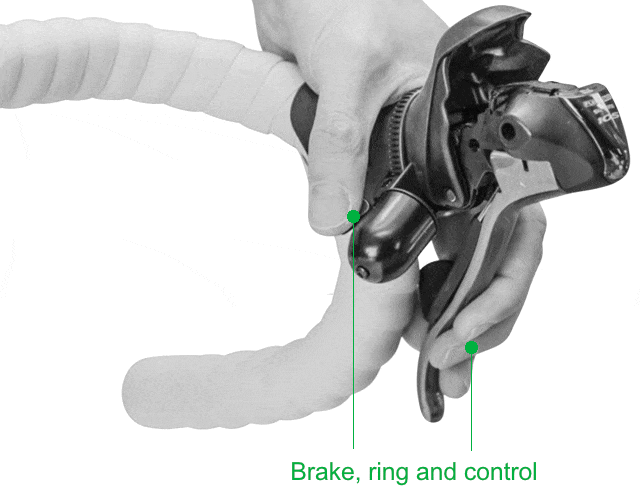
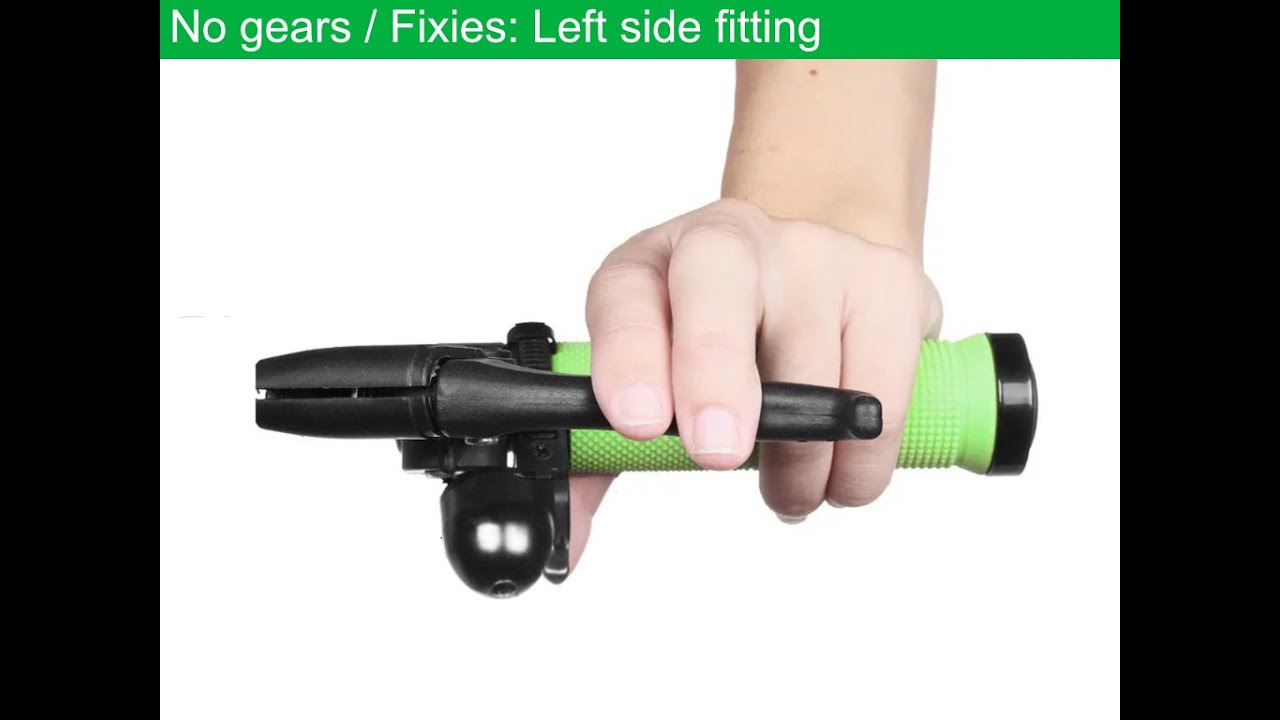
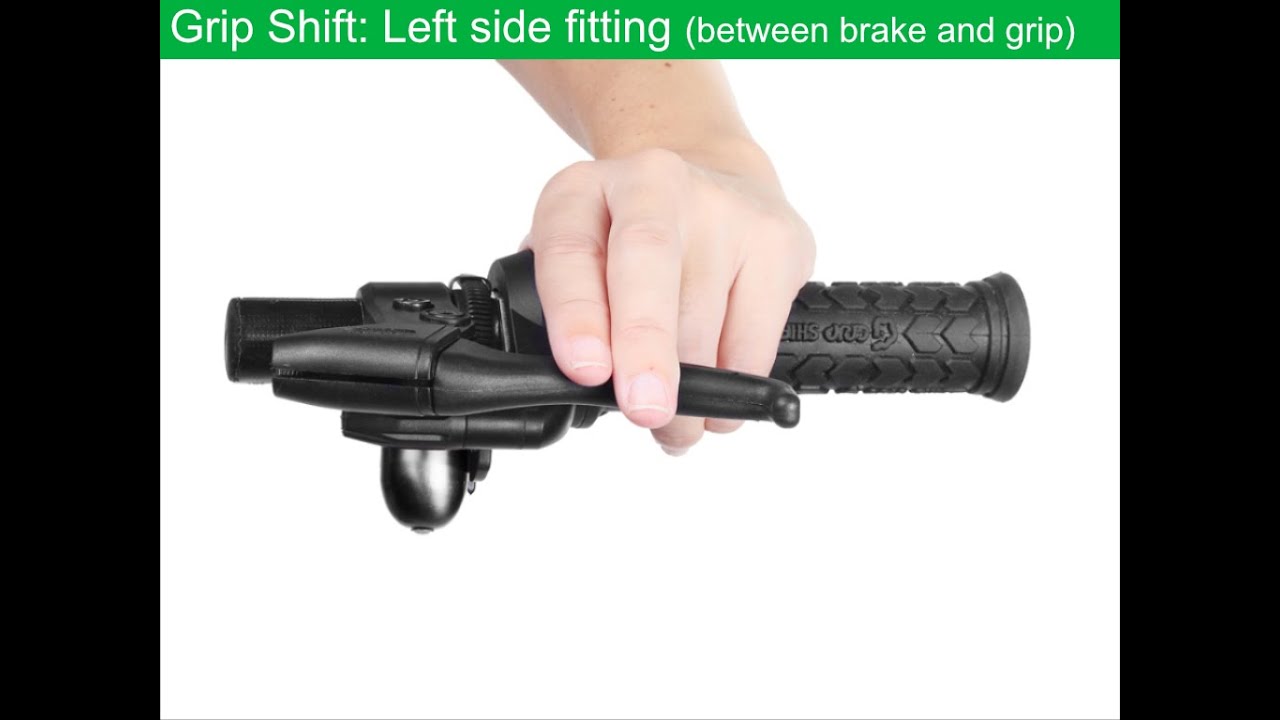
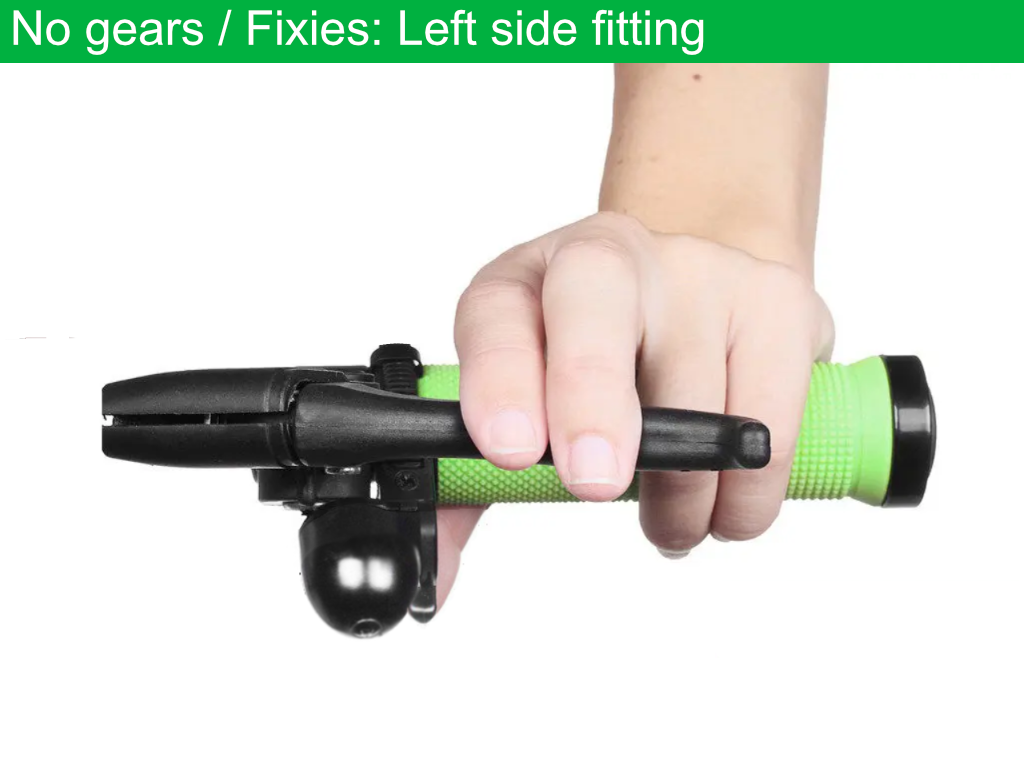
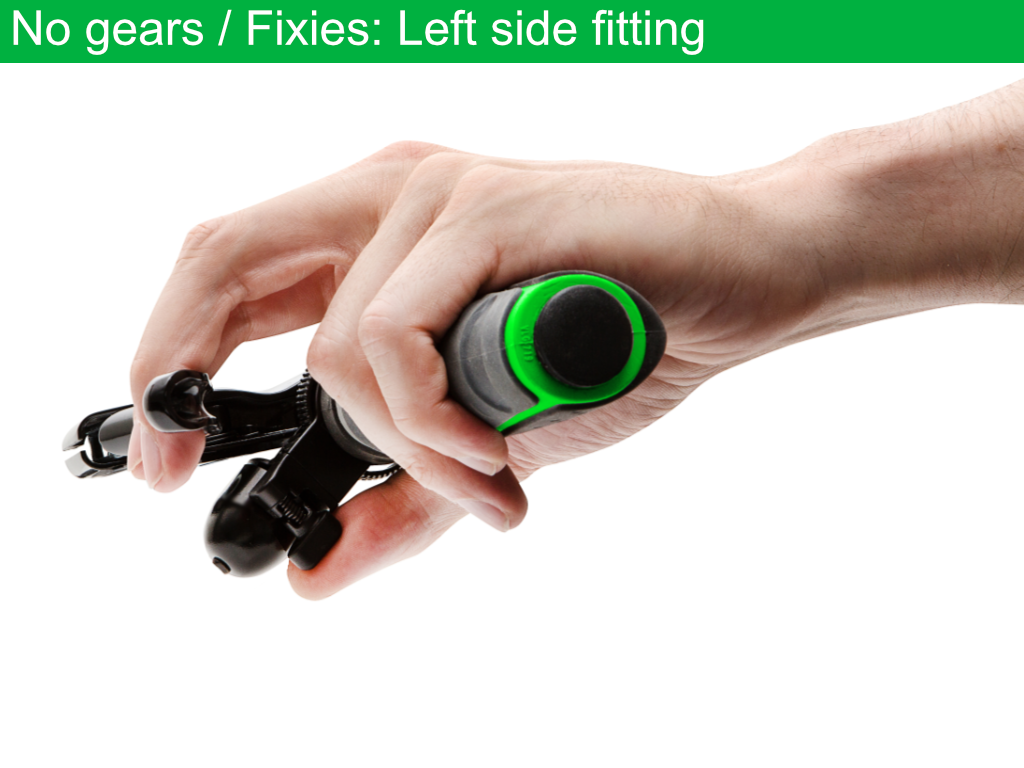
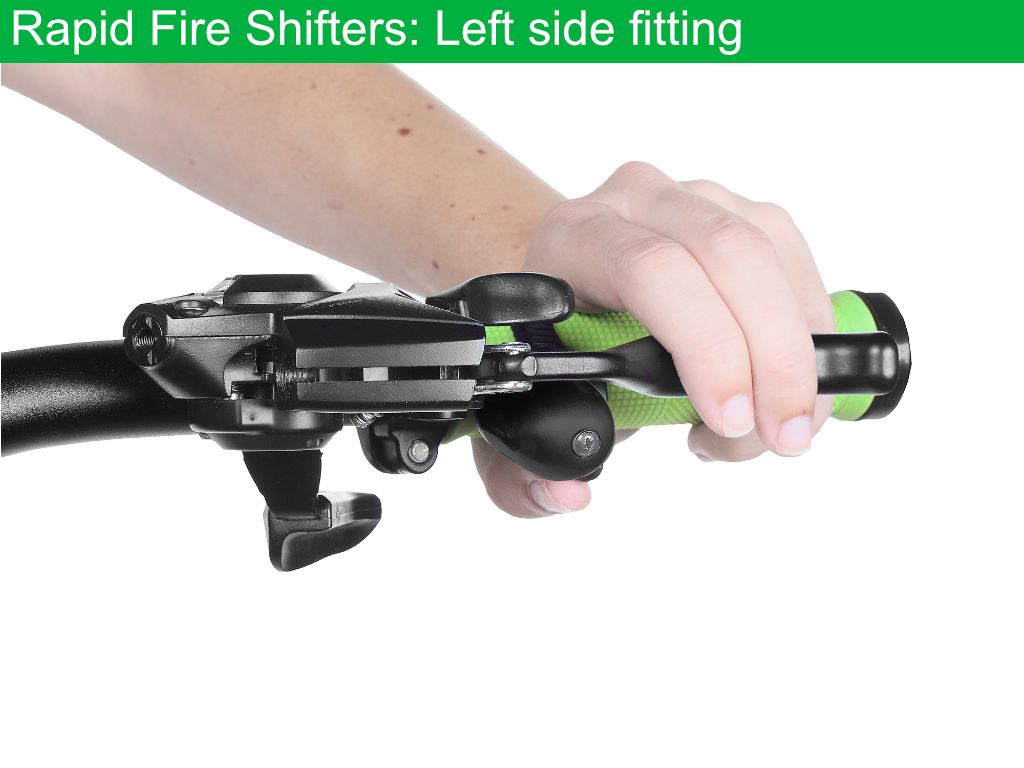
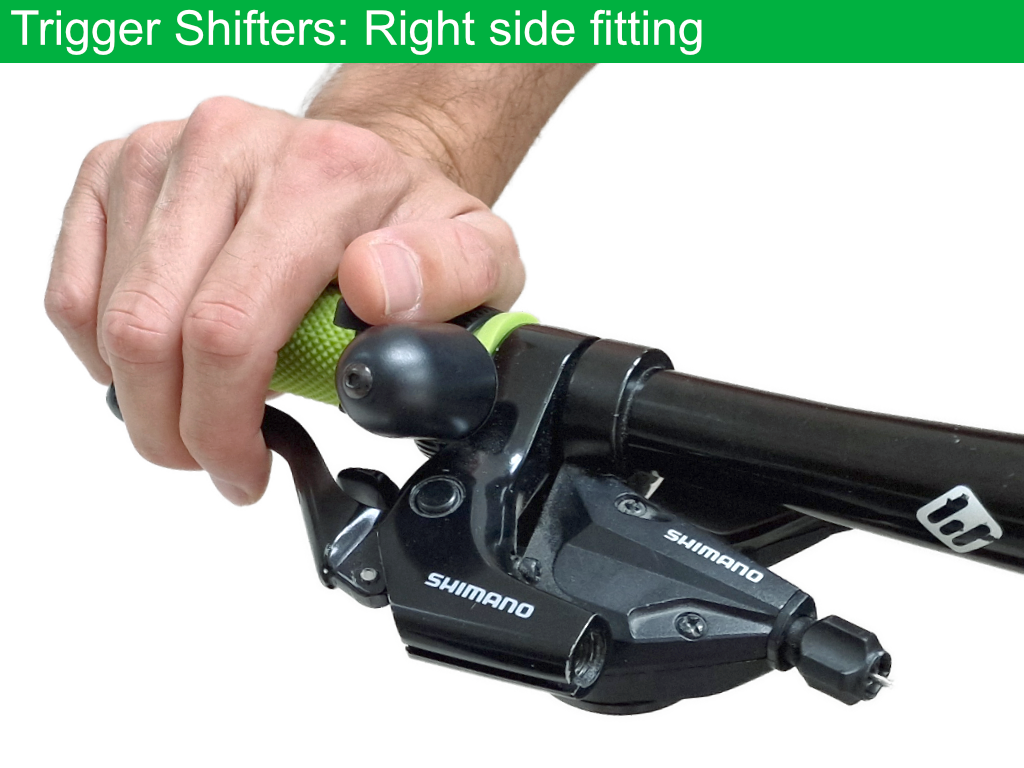
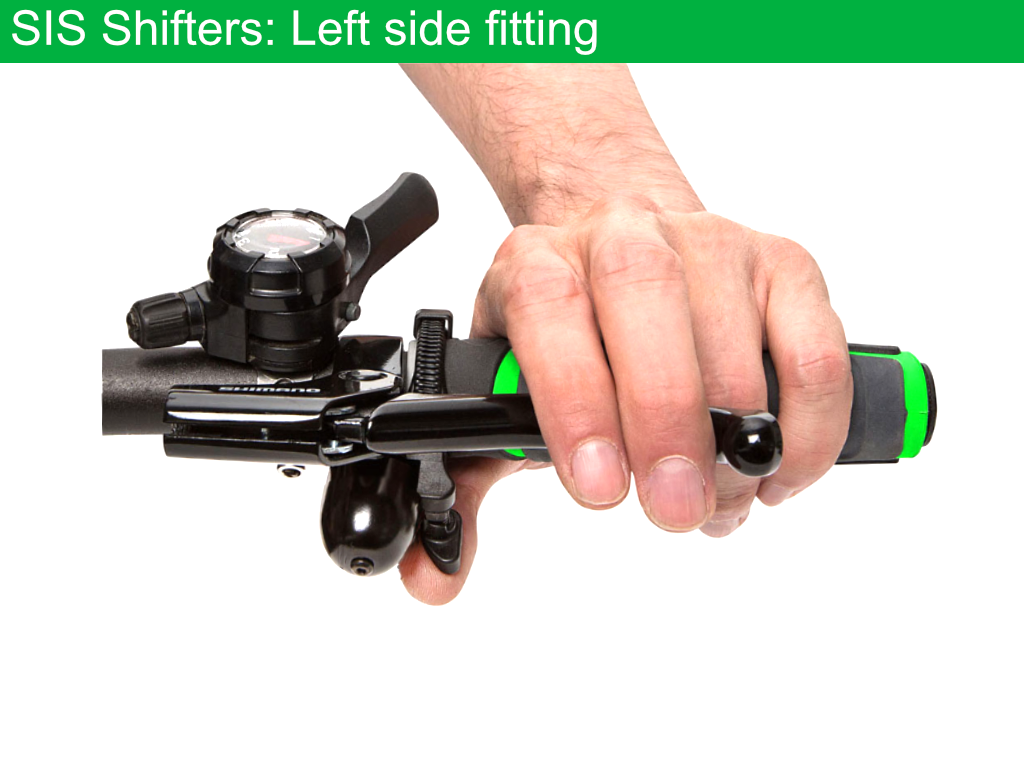
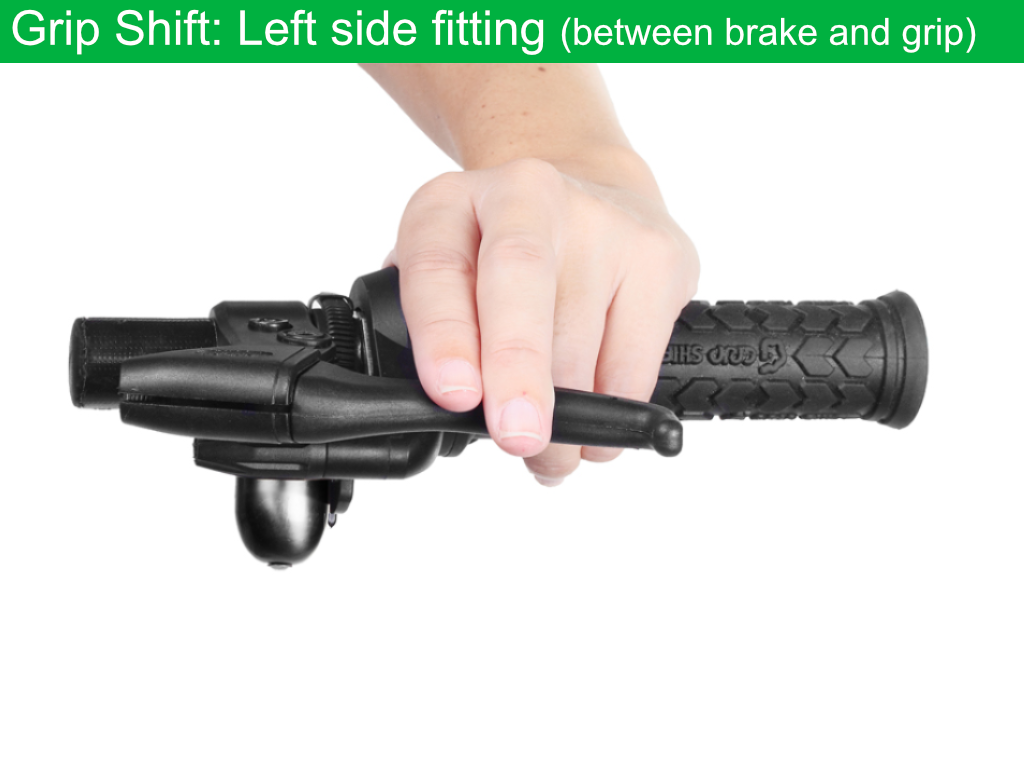
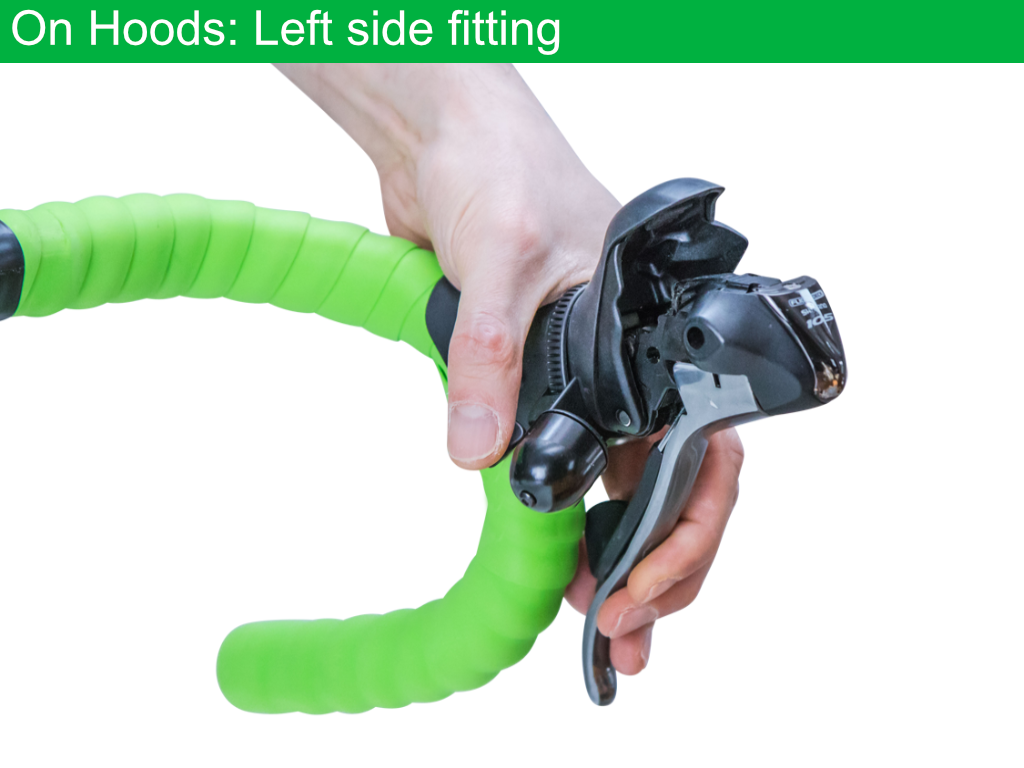
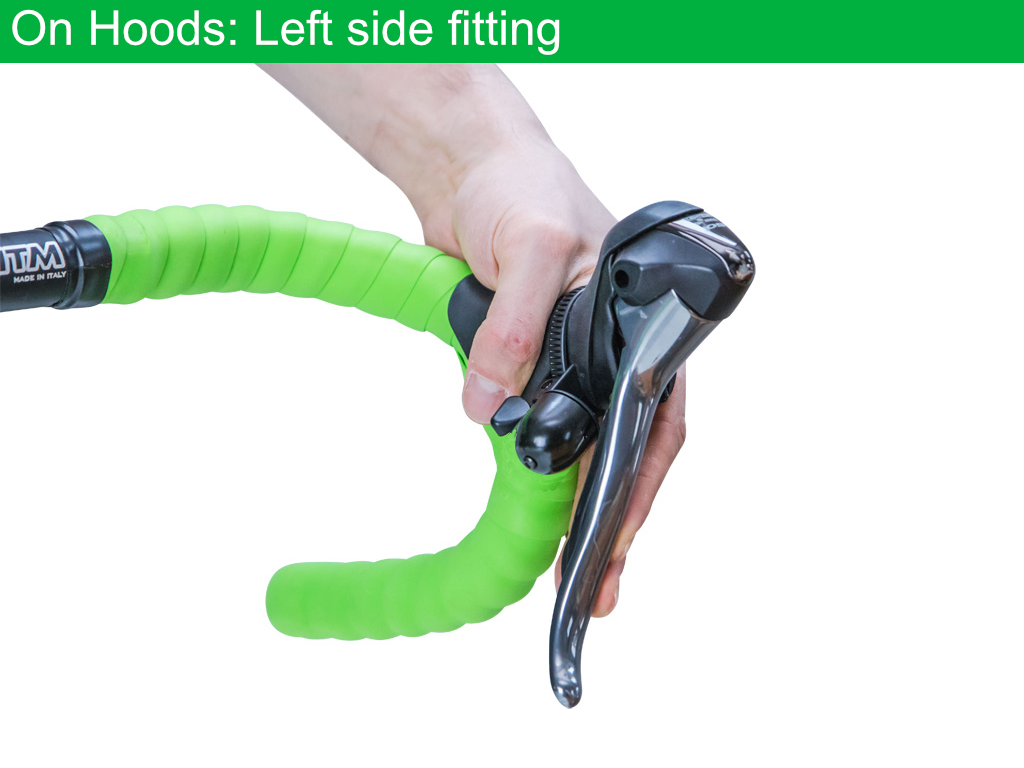
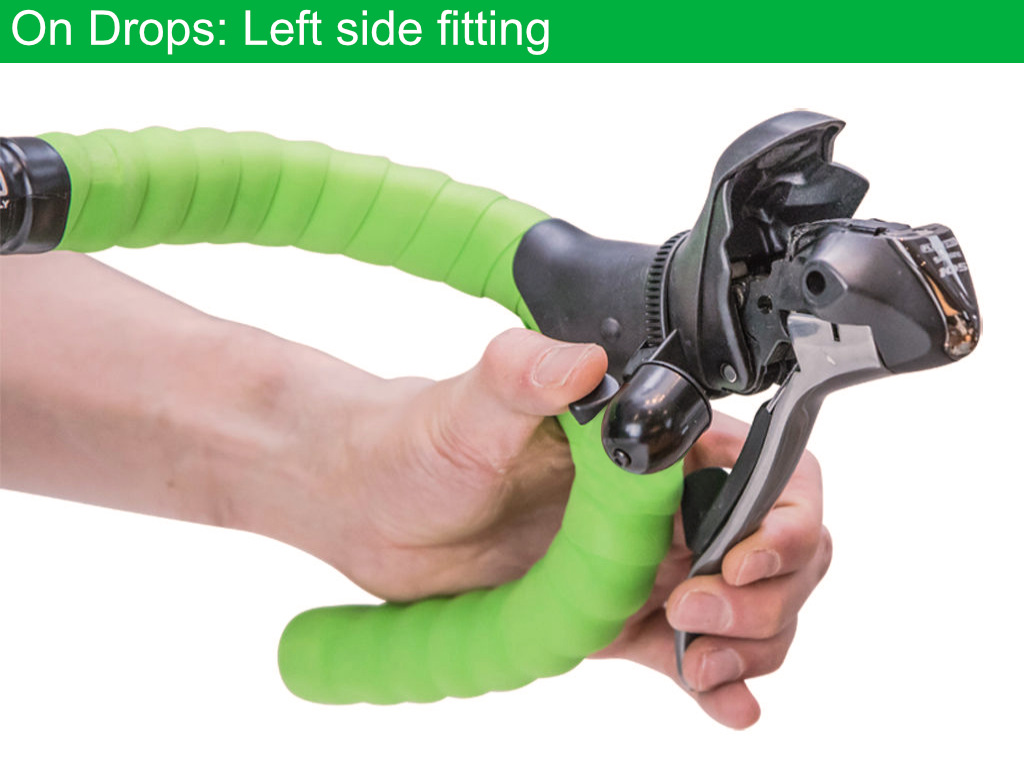
トリガーベルは、マウンテンバイク、シティバイク、レーシングバイク(ドロップハンドルとフード)、電動自転車、折りたたみ自転車を含むすべての自転車のハンドルグリップに直接取り付けることができます。

取り付けられたTrigger Bellの例

自転車ベルの特徴

1

パワフルな真鍮製ベル

2

柔軟なストラップ

3

頑丈なスプリング

4

コンパクトなサイズ

高品質の真鍮を使用しており、安価なアルミベルよりも暖かく、長く、より明瞭な音色を実現しています。

直径20mmから48mmのハンドルバーに取り付けることができます。または、円形ではなく最大周囲長150mmの楕円形のハンドルバーにも取り付けることができます。

標準的な4.8mm x 200mmの着脱可能なケーブルタイ(または必要に応じた他の長さ)で取り替えることができます。以下に手順を示します。

自転車ベルのトリガーは5万回以上の鳴らしテストを行い、まだ頑強に動作しています。

コンパクトで、長さ3.9 cm × 幅3.3 cm × 高さ2.5 cmであり、重さはたった23グラムです。

60秒でベルを取り付けることができます。

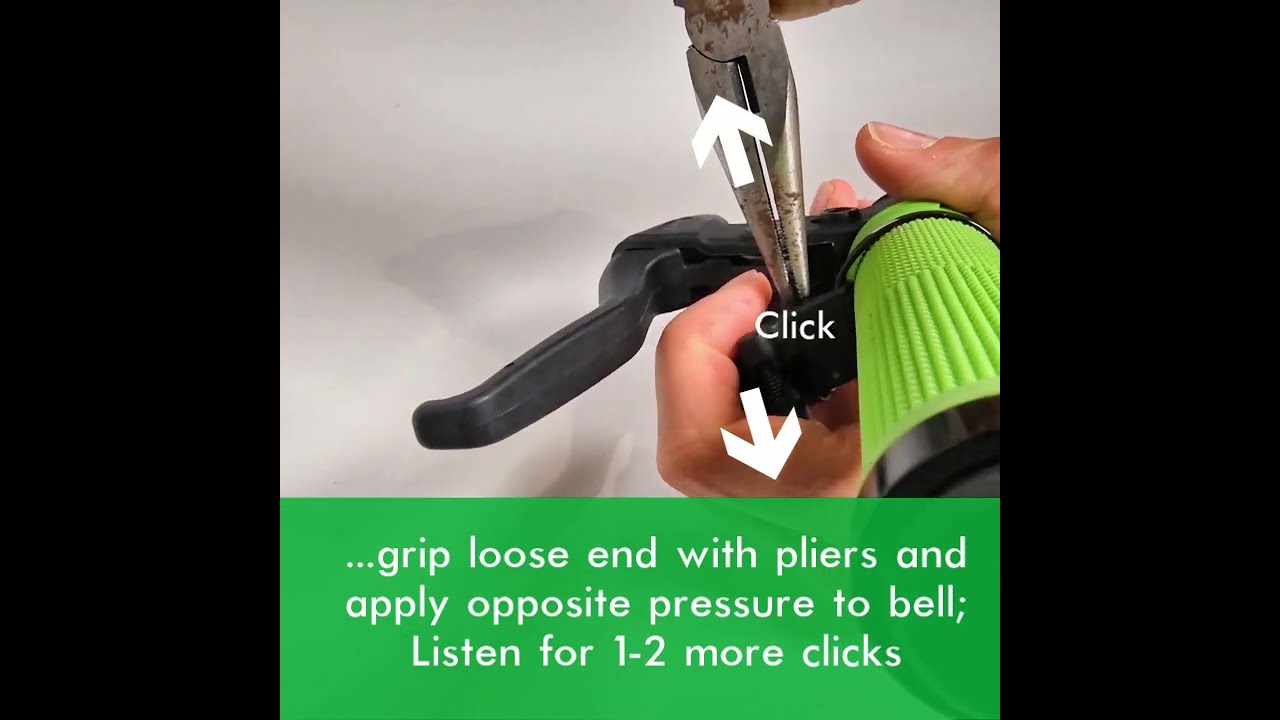
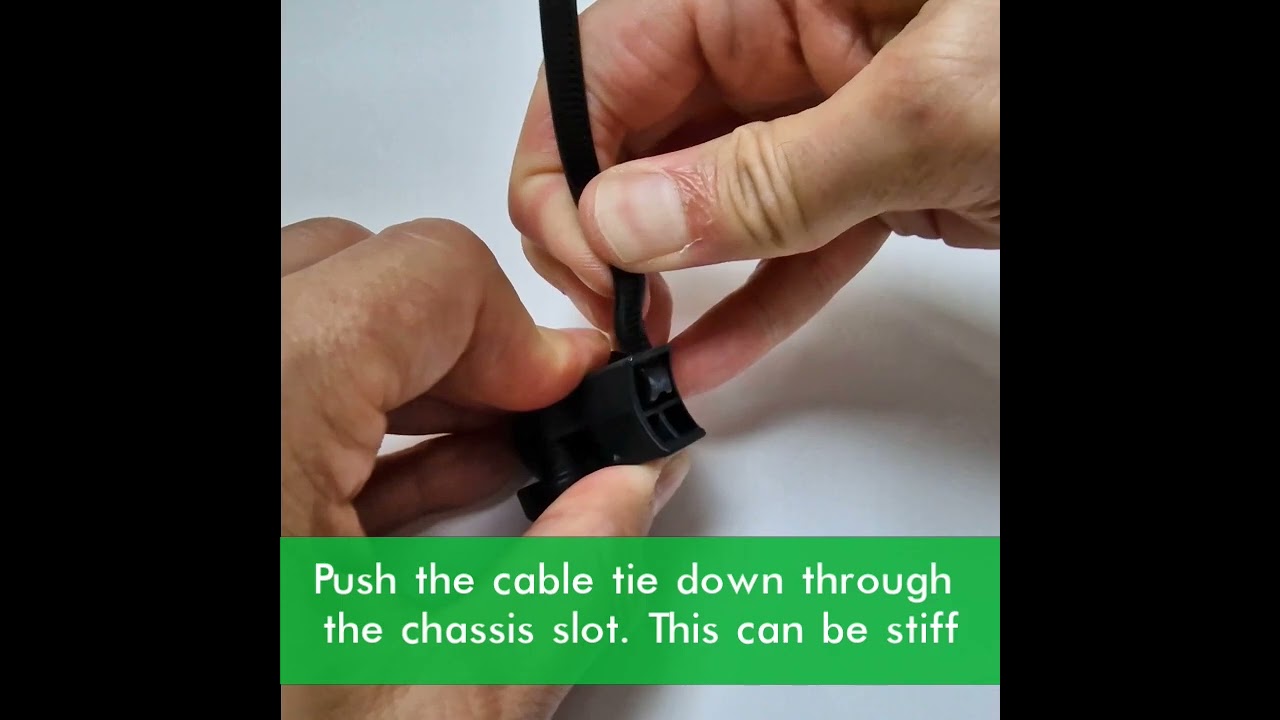
わずか60秒で簡単に取り付けられます 予備の再利用可能なケーブルタイとゴムパッドが付属しており、しっかりとした取り付けを保証します

5年間の保証

100%満足保証。Trigger Bellはイギリス製で、耐久性に優れています。もし最初の5年間に何か問題があれば、無料で返金または交換いたします。

自転車ベルの取り付け手順

Drop Bars

ロードバイク

  1. With a correctly fitted Trigger Bell v6 you can brake and ring 5 times per second
  2. Find where the Trigger Bell hammer should sit on your LEFT handlebar;
  3. Your thumb comfortably sits where bell hammer should be
  4. ドライバーを使ってケーブルタイを解除してください
  5. To position correctly, turn the bell upside down and wrap around the left hood
  6. Insert the loose end into the chassis and pull through to roughly secure Trigger Bell
  7. Test the position to ensure you can ring, brake and change gear
  8. Adjust if necessary and test again
    Secure in position by pulling the loose end of the cable tie again; Firmly pull down on the cable tie while applying upward pressure on the bell to hear a few more clicks
  9. Test for safer ringing
  10. Finally, trim loose cable tie leaving about 0.5cm excess
  11. If you need to tighten your cable tie a little more… grip loose end with pliers and apply upward pressure to bell; Listen for 1-2 more clicks

フラットバーハンドル

  1. With a correctly fitted Trigger Bell v6 you can brake and ring 5 times per second
  2. Find where the Trigger Bell hammer should sit; Your thumb comfortably sits where bell hammer should be
  3. ドライバーを使ってケーブルタイを解除してください
  4. To reattach, simply feed the cable tie back through the chassis
  5. Position correctly: Bell pointing forward and below left brake
  6. Tighten cable tie: Hold the bell in place and pull the loose end to ring while braking
  7. Final tighten: Hold the loose end and push the bell down; Hear 1-2 more clicks
  8. Test for safer ringing
  9. Finally, trim loose cable tie leaving about 0.5cm excess
  10. If you need to tighten your cable tie a little more… grip loose end with pliers and apply downward pressure to bell; Listen for 1-2 more clicks

Other instructions

  1. If you need to secure your Trigger Bell more tightly:
    1. Grip the loose end of the cable tie with a pair of pliers
    2. Apply opposite pressure to the bell
    3. Listen for clicks that mean the cable tie is tightening
  2. The video shows Trigger Bell fitted on flat bars but this technique applies to Trigger Bell fitted on any handlebars

今すぐ注文する